AOPA Millennium Mooney 2000 Sweepstakes Technicolor Dreamcoat
Getting More Than a Shiny New Layer for Your Next Airplane
By Marc E. Cook, AOPA Pilot, August, 2000
It’s true that an airplane’s paint job does nothing to keep it up in the air, except for, perhaps, preventing corrosion, thus eliminating the need for lots of draggy duct tape and the occasional attack of the Krylon can. But never underestimate the value of a shiny coat of color. Not only does your airplane appear to be faster, smoother, younger, and better maintained, but it’ll last longer if parked in a harsh environment, and it will have much better resale value. No matter how meticulously maintained an airplane may be, the condition of the exterior paint invariably leads potential customers and first-time passengers to certain nearly incontrovertible conclusions.


You won’t be surprised, then, when we say we take more than a bit of pride in the exterior finish of the Millennium Mooney. (Still, those of you who saw the airplane on display before the paint job may call us crazy for stripping off what was already a very good coat of factory circa-1987 paint.) Because the outside of the airplane is the first thing you’ll see walking up to it at an airshow—or the lucky winner sees when opening his hangar sometime in early 2001—we considered it critical to have not just a catchy and distinctive scheme but the best possible execution. We got both.
Craig Barnett, owner of Scheme Designers, is a graphic artist by trade but an airplane nut by avocation. His service provides design consultation for new aircraft paint schemes and does so with a strong background and myriad tools. He has templates for virtually every popular airplane and a keen eye for what will and will not work on the metal. His fees run from $350 for the basic stuff to $800 for a full-up custom scheme; for additional fees, Barnett will even visit your paint shop to see that the scheme is being applied correctly. (You’d be amazed at how often a great design gets lost in the translation.)
Traditionally, we’ve had AOPA Pilot Art Director Mike Kline spend some of his valuable time conjuring up a scheme for the sweepstakes airplane, but when Barnett made his interest clear, we thought it’d be a fine chance to give him a try. We’re glad we did.
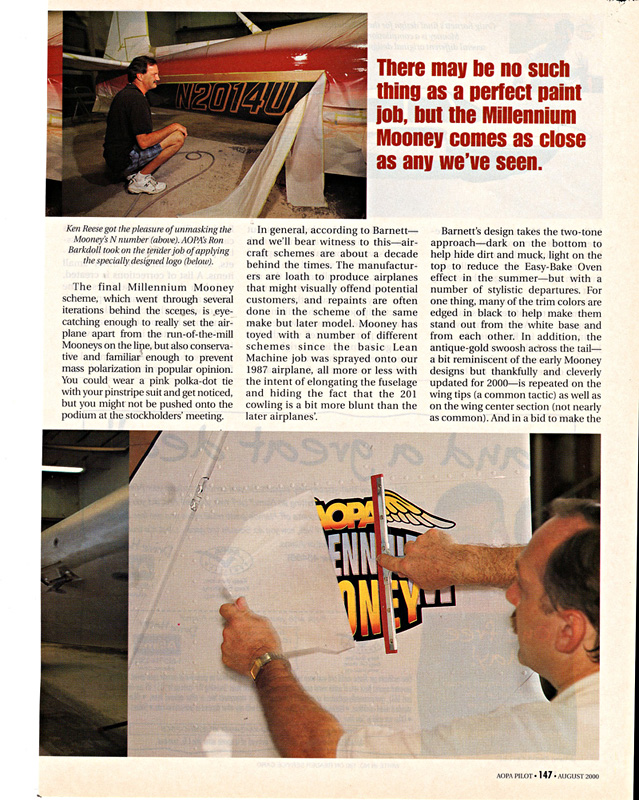
The final Millennium Mooney scheme, which went through several iterations behind the scenes, is eye-catching enough to really set the airplane apart from the run-of-the-mill Mooneys on the line, but also conservative and familiar enough to prevent mass polarization in popular opinion. You could wear a pink polka-dot tie with your pinstripe suit and get noticed, but you might not be pushed onto the podium at the stockholders’ meeting.
In general, according to Barnett—and we’ll bear witness to this—aircraft schemes are about a decade behind the times. The manufacturers are loath to produce airplanes that might visually offend potential customers, and repaints are often done in the scheme of the same make but later model. Mooney has toyed with a number of different schemes since the basic Lean Machine job was sprayed onto our 1987 airplane, all more or less with the intent of elongating the fuselage and hiding the fact that the 201 cowling is a bit more blunt than the later airplanes’.
Barnett’s design takes the two-tone approach—dark on the bottom to help hide dirt and muck, light on the top to reduce the Easy-Bake Oven effect in the summer—but with a number of stylistic departures. For one thing, many of the trim colors are edged in black to help make them stand out from the white base and from each other. In addition, the antique-gold swoosh across the tail—a bit reminiscent of the early Mooney designs but thankfully and cleverly updated for 2000—is repeated on the wing tips (a common tactic) as well as on the wing center section (not nearly as common). And in a bid to make the Millennium Mooney maintenance-friendly, the forward trim lines run below the upper/lower cowling cut line; trim colors that normally slice through here tend to get chewed up over time.
Executing Barnett’s dynamic design became the task of Ken Reese and his company, KD Aviation Inc., whose main site is in Robbinsville, New Jersey. Reese and Barnett have worked together on a number of projects and, in fact, offered to keep the bond to ensure this complex design was put onto the airplane as envisioned. Barnett’s vision probably will appeal to most pilots but, with all due respect to Barnett, what really makes this airplane grab your eye is the execution. There may be no such thing as the perfect paint job, but the Millennium Mooney comes as close as we’ve seen.
As any painter will tell you, the key to a good finish is the right start. When Reese and his crew—his shop has been in operation for 20 years at Robbinsville—receive an airplane, it’s carefully inspected for damage, missing parts, popped and “smoking” rivets, and a number of other small items. A list of corrections is created, and then the control surfaces come off the airplane. In many shops, that’s about where the chemical stripper comes out, but not at KD Aviation.
The next step is to remove all inspection plates and all plastic and fiberglass components. The metal airframe is then carefully masked, right down to the brake hoses in the wheel wells and, naturally, all plexiglass. Reese estimates that about 95 percent of the labor in a paint job is in the prep, which would include all steps leading up to actually applying the paint itself. Once the prep is done, it takes only about four hours to paint an airplane.
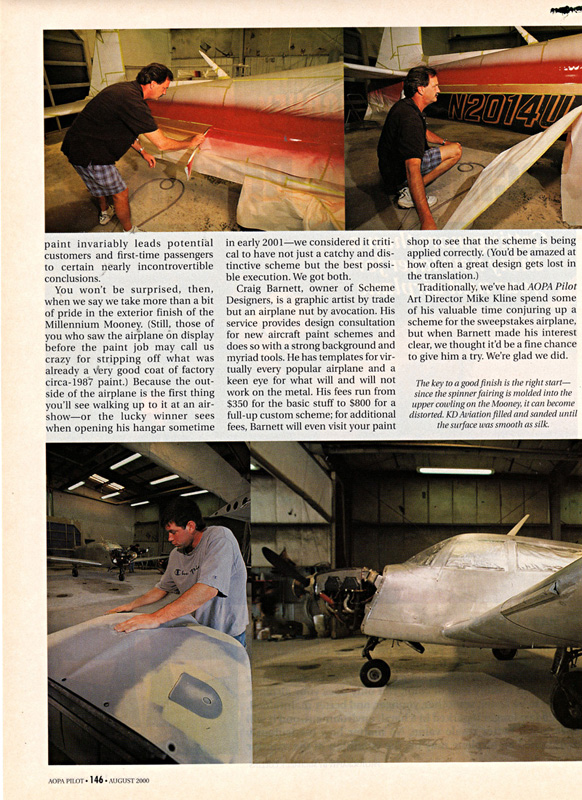
Plastics and composites go off to a separate room where they’re hand-sanded and prepped. Reese refuses to use any stripper or even aggressive exfoliation on composites because of the risk of breaking through the gel coat. (Fiberglass and like composites are based on woven fabrics and have significant voids or pinholes in the finished product. As part of manufacturing, a coat of filler/primer is applied to the part to give it a smooth, pinhole-free surface; this coating can be extremely thin, hence Reese’s caution.) For some airplanes, additional fiberglass work is warranted. On the Mooney, for example, the upper cowling is often distorted and cracked where the spinner fairing is molded into it. The transition from the cone-shaped afterbody to the semiflat upper surface of the cowling is particularly hard to do well, but Reese’s crew filled and sanded and filled and sanded until it was razor-straight.
Meanwhile, back in the main hangar, the airframe receives a chemical stripper. Normally, paint shops use a liquid stripper to lift off the paint, dirt, junk, stickers, bug parts, and primer, then wash it with high-pressure water. The water removes the lifted gunk and supposedly dilutes the stripper so that any remaining chemicals are harmless to the airframe. Reese wonders about that. So he uses a chemical stripper that’s intended to dry on the airframe in 24 hours and removes it with a plastic-media blast.
Hold on…wait a minute. Didn’t that technology come and go a couple of decades ago, departing amid ruined airframes and reputations? Not exactly. Reese witnessed media-blasting come into the industry but noted that the technicians were using a lot of pressure and lingering too long on certain parts of the airframe. The result was damaged aluminum, wavy panels, and pitted skins. Instead, Reese uses a special low-pressure gun and allows the chemical stripper to do most of the grunt work. The media blast serves mostly to remove the detritus without working any of it back into the skins and seams. Viewing the results, you’d have to admit that he knows what he’s doing.
Next comes an industry-standard acid etch and Alodine treatment. The Alodine provides corrosion resistance and offers something for the primer to grab in the next phase. Most shops would start laying down primer at this point, but not KD Aviation. Instead, Reese takes the precaution to blow out the airframe, seam by seam, at least three times before proceeding. This step ensures that any grit and grime inside the airframe or hidden in lap joints will not migrate out to ruin the finish coats. And just before the primer hits the gun, Reese insists on a conversion coating (or wash prime) to make sure any parts of the airframe that might have been disturbed by the big blowout are now recoated and properly corrosion-protected. Sheesh, what’s this guy waiting for?
A primer coat follows, with a 24-hour interval before it’s lightly scuffed out by hand, and then the application of the base coat. For our airplane and the vast majority of the jobs he does, Reese insists on Sherwin-Williams (formerly Pratt and Lambert) products. The Millennium Mooney used a combination of Jet Glo polyurethanes and Acry Glo urethanes.
Once the painting is complete, there’s significantly more to be done, including the balancing and reinstallation of the control surfaces and a gear-retraction test. (Most good shops do the former, few the latter.) As you might expect, given the number of steps and the tremendous amount of labor involved, a KD Aviation paint job is not cheap. It’s a testament to the quality of Reese’s work and his reputation that even at premium prices, the shop maintains a large backlog all year long.
AOPA would like to thank the following companies that donated or discounted their products and services to refurbish the Millennium Mooney or otherwise assisted in the project:
Painting
KD Aviation Inc.
106D Sharon Road
Robbinsville Airport
Robbinsville, New Jersey 08691
609/586-9283; fax 609/259-7260
www.kdaviation.com
Paint design
Scheme Designers
277 Tom Hunter Road
Fort Lee, New Jersey 07024
201/947-5889
www.schemedesigners.com